After encountering Medley Interlisp I set out to learn the system, as I'd like to contribute to the project and use Medley Interlisp as my primary development environment.
Along with reading the documentation and playing with the system, I started a programming project.
I wanted to create something small that carries out a limited but useful task. My goal was to familiarize with the Medley Interlisp development environment, tools, and process through developing, optimizing, documenting, and sharing an Interlisp program.
I hoped to build a prototype with basic functionality I could finish quickly to have something to play with and extend. Blame instant gratification, and Lisp's productivity.
So I wrote a program I called Stringscope as a nod to the Masterscope program analysis tool of Interlisp.
The program
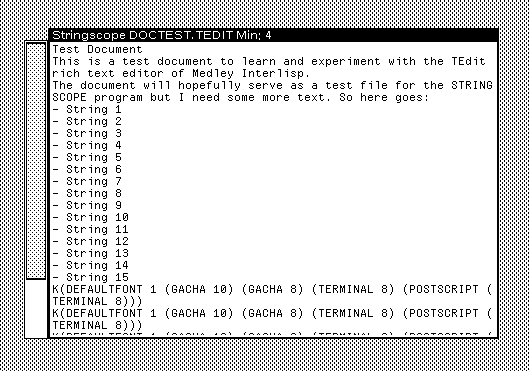
Stringscope is a tool to display a list of the text strings contained in a binary file, i.e. the sequences of printable characters longer than a minimum threshold of 4 characters. The program is similar to the Unix tool strings.
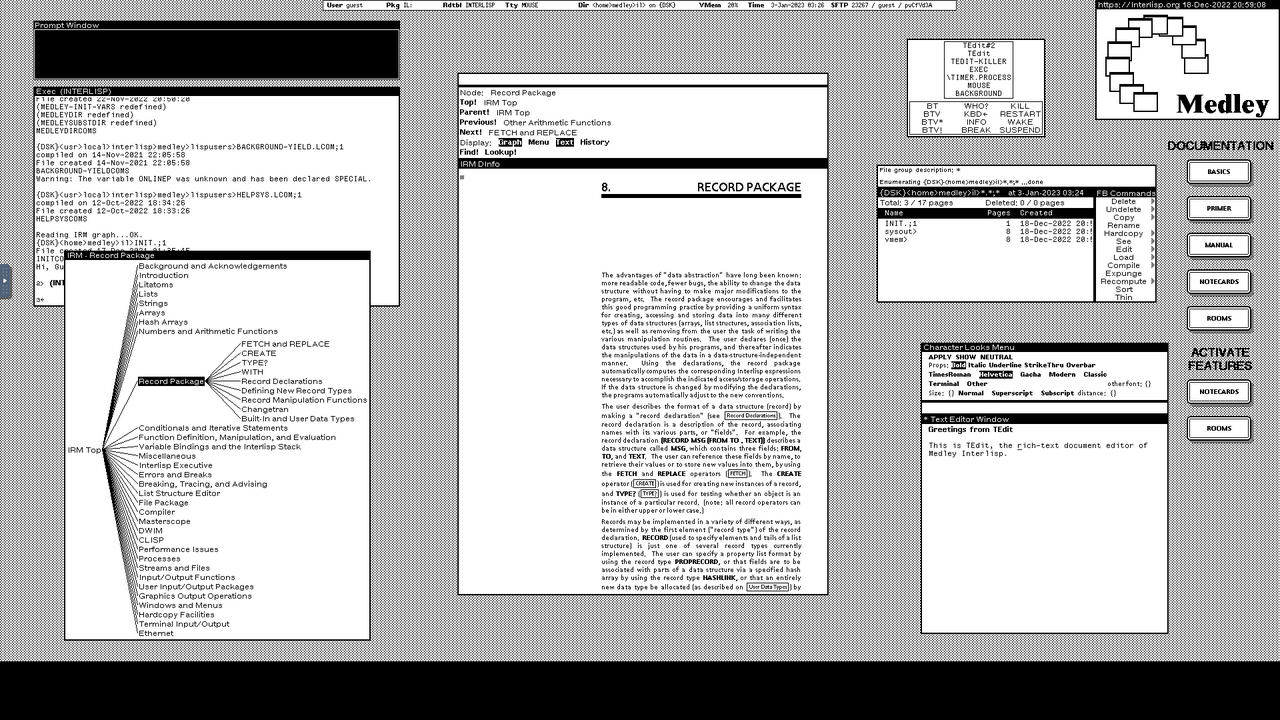
This is the output window of Stringscope:
The above screenshot is a crop of the full Medley Interlisp desktop:
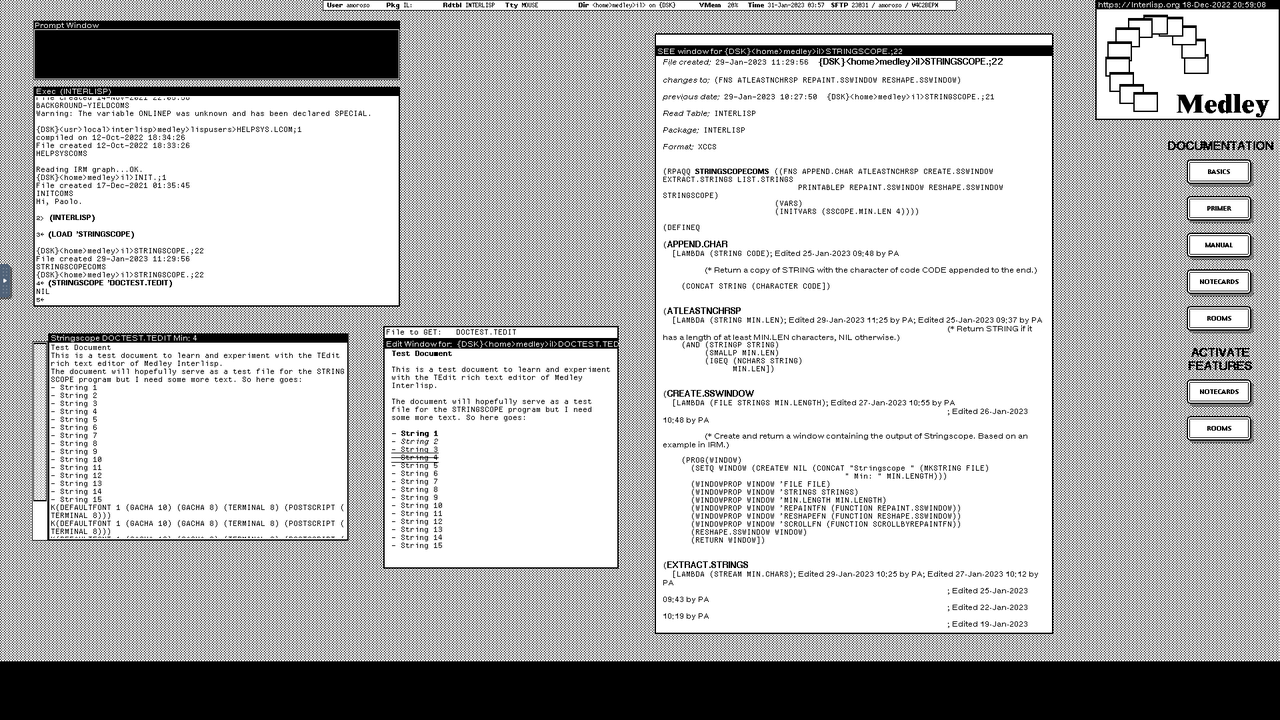
The Stringscope window shows the output of feeding into the program a word processor document as input. At the right of Stringscope is the TEdit rich text editor with the same document loaded. TEdit writes binary files that contain text and formatting commands, some of which are seen at the bottom of Stringscope window's. The largest window on the desktop shows the source code of Stringscope.
The scroll bar along the left edge of Stringscope's window is a small win I'm proud of.
The Medley Interlisp windowing environment doesn't automatically repaint program-created windows. So I had to figure out how set up Stringscope's window to repaint its content and make it scrollable. I managed to find the right code snippet in the Interlisp Reference Manual and repurposed it.
Usage
Stringscope first needs to be loaded by evaluating this Lisp expression, which assumes the file is in the current directory:
(LOAD 'STRINGSCOPE)
Next, the program is launched by evaluating:
(STRINGSCOPE FILENAME MIN.LEN)
where FILENAME is a file name and MIN.LEN the optional minimum length text strings must have. The default is 4 characters but is user-configurable by changing the global variable SSCOPE.MIN.LEN.
The function STRINGSCOPE opens the input file and feeds the resulting stream into the EXTRACT.STRINGS function, which runs a state machine that recognizes strings and adds them to the output. After receiving the returned list of strings, STRINGSCOPE prompts the user to create a window and sets it up to display the output and respond to repaint and scroll events.
Development
I developed Stringscope on my Chromebox with Interlisp Online, the cloud version of Medley Interlisp accessible from a browser via the noVNC VNC client.
Coding with the SEdit structure editor was smooth and highly productive.
As an image-based environment, in Medley Interlisp the code in memory may be saved to permanent storage by dumping the full memory image. But sources are usually saved to external files by the File Manager that's conceptually similar to the Unix tool Make. The File Manager is a collection of tools to notice, keep track of, and write to files the changes to a Lisp system under development.
Optimization
So far I ran Stringscope on small inputs but I eventually want to process larger files which may require optimizing the code with Spy, the main profiling tool of Medley Interlisp.
To get a feel of Spy I instrumented STRINGSCOPE, soon realizing the profiler collects a lot of unnecessary data related to window and system functions that have little influence on the overall running time. So I'll focus the analysis on EXTRACT.STRINGS which performs the I/O, manipulates the data, and does most of the processing.
Documentation
A lot of the digital documentation that ships with Medley Interlisp and user-contributed software was written with TEdit, the system's versatile rich text editor.
I'd like to use it to write the documentation of Stringscope but TEdit is not fully usable yet. The arrow keys don't work, a showstopper for non trivial text editing. The restoration and modernization of Medley Interlisp is under way and the issue will eventually be fixed, but I'll have to defer natively documenting Stringscope until then.
In the meantime these notes on my blog will have to do.
Sharing
Another major goal of Stringscope is to share my work and get feedback from experienced Interlisp developers.
Interlisp code is stored in “symbolic files”, Medley Interlisp jargon for source files. However, symbolic files are databases rather than traditional source files and they aren't usually edited directly. Instead, code is edited in memory with SEdit and the File Manager takes care of writing and updating symbolic files when the code is modified.
Although symbolic files are text files, exporting and publishing them involves some preparation and adaptation.
First, with Online Interlisp the files need to be downloaded from the cloud. Next, they may need some cleaning.
Symbolic files contain control codes for syntax highlighting and prettyprinting to render different text sizes and attributes such as bold. See for example the Stringscope code in the above screenshot of the desktop.
This is an effective way of presenting code in the environment. The downside is many Lisp symbols are wrapped in sequences of control codes that encode the formatting, which look like spurious characters in ASCII viewers and editors. Moreover, some Interlisp symbols, such as the left arrow ←, have the same ASCII code of the underscore character _.
I manually downloaded Stringscope's symbolic file with the noVNC file manager of Online Interlisp, pasted it into a text editor to strip the control codes, pasted the cleaned up code into a GitHub gist for publication, and replaced _ with ←.
The result is acceptable. But this quick solution is not adequate in the long term as it doesn't scale, and the code can't be directly loaded into Medley Interlisp.
I'll think about how to automate the download and sharing of symbolic files, likely via GitHub. A repo is handy also for hosting PDF files obtained by printing symbolic files to PostScript files in Medley Interlisp and converting to PDF. The PostScript output preserves the text formatting and is easier to read.
Further development
Stringscope is an ongoing project and there's still work to do starting from what is missing, such as profiling and documenting. Another step is to compile the program, as I ran it interpreted so far, making sure the latest compiled binary is loaded.
I'd also like to extend Stringscope with new features such as user interface controls and options for sorting the output, filtering it by string length, and rescanning the input with different minimum string lengths. And it shouldn't be too difficult to call Stringscope from the FileBrowser when a file is selected.
Finally, I want to allow other Lisp programs and functions to call Stringscope to receive the raw output for further processing. In Medley Interlisp, pretty much every piece of code is a building block other code may access and use, so I want Stringscope to contribute too.
Above all, I want Stringscope's evolution to help improve my proficiency with Medley Interlisp.
#stringscope #Interlisp #Lisp
Discuss...
Email | Reply @amoroso@oldbytes.space