Paolo Amoroso's Journal

Z80MBC2

I ported to CP/M Twirl, a twirling bar animation demo in Intel 8080 Assembly. I originally developed it for emuStudio, an emulator and development environment that recreates a number of classic computers and CPUs. The port runs on any CP/M system with an ANSI terminal or display.

I recorded a screencast that shows Twirl running under CP/M 3.0 on the Z80-MBC2 computer, controlled from a Minicom terminal emulator session under Crostini Linux on my Chromebox.

How it works

The demo displays an ASCII animation of a bar twirling clockwise at the home position of the console, i.e. the top left corner. After clearing the screen, Twirl repeatedly moves the cursor to the console home, prints the current animation frame, and checks for key presses to decide whether to terminate.

Although visually simple, the program demonstrates some key Assembly programming techniques such as looping, calling BDOS functions, and doing output with ANSI escape codes.

Porting

The original Twirl runs on a virtual Altair 8800 computer with a Lear Siegler ADM-3A terminal emulated by emuStudio.

However, I designed the program intending to port it to CP/M. The necessary work consisted in replacing the Altair-specific I/O rutines with equivalent BDOS calls for printing a single character (function 02h) and a string (09h) of ANSI escape codes, and checking the console status for key presses (0bh).

The program logic works as is, but I had to modify the CP/M version for defining the appropriate constants and ANSI escape strings, as well as adapting to the execution environment of the operating system and returning control to it.

Building and running

For me, the whole point of writing programs like Twirl and getting Z80 hardware is to use Suite8080, the suite of Intel 8080 Assembly cross-development tools I'm writing in Python. The CP/M port is a new Suite8080 Assembly demo I built from source on Linux with asm80, the Suite8080 assembler:

$ asm80 twirl.asm

I tested the resulting 74 bytes twirl.com executable under CP/M 2.2 with the CP/M software emulators ANSI CP/M emulator and z80pack.

Running the demo at the CP/M prompt is straightoward:

B>twirl

Pressing any key quits Twirl and returns control to the operating system.

To exeute Twirl on actual hardware I converted twirl.com to Intel HEX format with z80pack's bin2hex tool, then transferred the twirl.hex file to the Z80-MBC2 under CP/M 3.0.

It was really rewarding to see Twirl come to life on a real Z80 computer and get a sense of its performance.

The code

Here is the full code of the CP/M port of Twirl:

; Twirling bar animation.
;
; Runs on CP/M with an ANSI terminal. Press any key to quit the program.


TPA        equ      100h
BDOS       equ      0005h
WRITESTR   equ      09h                ; Write string
WRITECHR   equ      02h                ; Write character
CONSTAT    equ      0bh                ; Console status

FRAMES     equ      8                  ; Number of animation frames


           org      TPA
            
           mvi      c, WRITESTR
           lxi      d, cls             ; Clear screen
           call     BDOS

loop:      lxi      h, anim            ; Initialize frame pointer...
           mvi      b, FRAMES          ; ...and count

loop1:     push     h
           push     b
           mvi      c, WRITESTR
           lxi      d, home            ; Go to screen home
           call     BDOS
           pop      b
           pop      h

           push     h
           push     b
           mvi      c, WRITECHR
           mov      e, m               ; Print current frame
           call     BDOS
           pop      b
           pop      h

           push     h
           push     b
           mvi      c, CONSTAT         ; Get console status
           call     BDOS
           pop      b
           pop      h
           ora      a                  ; Key pressed?
           jnz      exit               ; Yes

           inx      h                  ; Point to next frame
           dcr      b                  ; One fewer frame
           jnz      loop1

           jmp      loop

exit:      ret


cls:       db       1bh, '[2J$'        ; ANSI clear screen: ESC [ 2 J
home:      db       1bh, '[H$'         ; ANSI go to screen home: ESC [ H
anim:      db       '|/-\|/-\'         ; 8 frames

           end

The program represents the animation as the string |/-\|/-\, a sequence of ASCII characters that show the bar at various steps of the rotation.

After clearing the screen, Twirl begins the main loop loop: by initializing the frame pointer and count. An inner loop loop1: prints each animation frame, i.e. the characters of the animation sequence.

The inner loop moves the cursor to the home position and prints the current frame. Then it updates the frame pointer and count, and checks whether a key was pressed. In case of a key press the inner loop exits the program, otherwise it jumps back to the beginning of the main loop.

#Assembly #retrocomputing #Suite8080 #z80mbc2 #CPM

Discuss... Email | Reply @amoroso@fosstodon.org

Many thanks to Jan Rösner and Bastian Schade, the editors of 8bitnews, for featuring my Z80-MBC2 projects and adventures in issue #55. 8bitnews is my favorite retrocomputing newsletter, I don't miss a single issue and always read it cover to cover.

#z80mbc2 #sbc #retrocomputing

Discuss... Email | Reply @amoroso@fosstodon.org

I'm still troubleshooting a file transfer issue between Crostini Linux and the Z80-MBC2. Sending files from Crostini to the Z80 computer via XMODEM times out, but I figured and tested an effective workaround.

The workaround, which works only for ASCII transfers, consists in pasting a text file from the Minicom terminal emulator into an ED session on CP/M, i.e. sending the contents of the file as if they were typed in. Saving ED's buffer makes the file available on CP/M.

More specifically, this sample Minicom session shows the steps I go through for sending the file greet.hex from Crostini to the Z80-MBC2.

Pasting a text file into an ED session from Minicom on Linux to CP/M on the Z80-MBC2.

First off, it's essential to set at least a 5 ms character transmit delay in Minicom's terminal settings, otherwise the board can't keep up with the flow of data. I press the keystrokes ^A T F to execute the command Terminal settings > Character tx delay (ms). I actually changed the Minicom escape from ^A to ^Y, but in the following I'll continue with the default ^A.

Next, at the CP/M prompt I run the ED text editor for creating a new file GREET.HEX to hold the text coming from Crostini:

B>ed greet.hex

After entering insert mode with the i command, ED is ready to accept any characters typed in — or coming through the serial line connected to the terminal.

In Minicom, I proceed to invoke the Paste file command with the keystrokes ^A Y and select greet.hex on the Crostini file system. One by one, the characters of the file appear in ED's buffer. When Minicom completes pasting greet.hex, in ED I execute the commands #w to save the full text and e to exit the editing session.

The file is now available on CP/M. For example, with the standard tool LOAD I can convert GREET.HEX in Intel HEX format to an executable .COM program:

B>load greet.hex

FIRST ADDRESS 0100
LAST  ADDRESS 0121
BYTES READ    0022
RECORDS WRITTEN 01

Finally, the greet.com hello world demo is ready for execution on CP/M:

B>greet
Greetings from Suite8080

This workaround is slower than XMODEM transfers, but still acceptable and practical.

Pasting text files lets me indirectly send arbitrary binary files to CP/M. Executable programs can be converted to HEX format. Other binary, non-excutable files need uuencoding or processing with similar text-encodings.

#z80mbc2 #sbc #CPM

Discuss... Email | Reply @amoroso@fosstodon.org

It's been over a week since I received the Z80-MBC2 Z80 single-board computer, so I got a chance to spent some time exploring and playing with it. Although I shared some usage updates, it's time for some notes on how the board is working, its value and potential, and the issues I'm facing.

I wish to thank the board's developer and the retailer I bought it from, who clarified some features and details.

Hardware

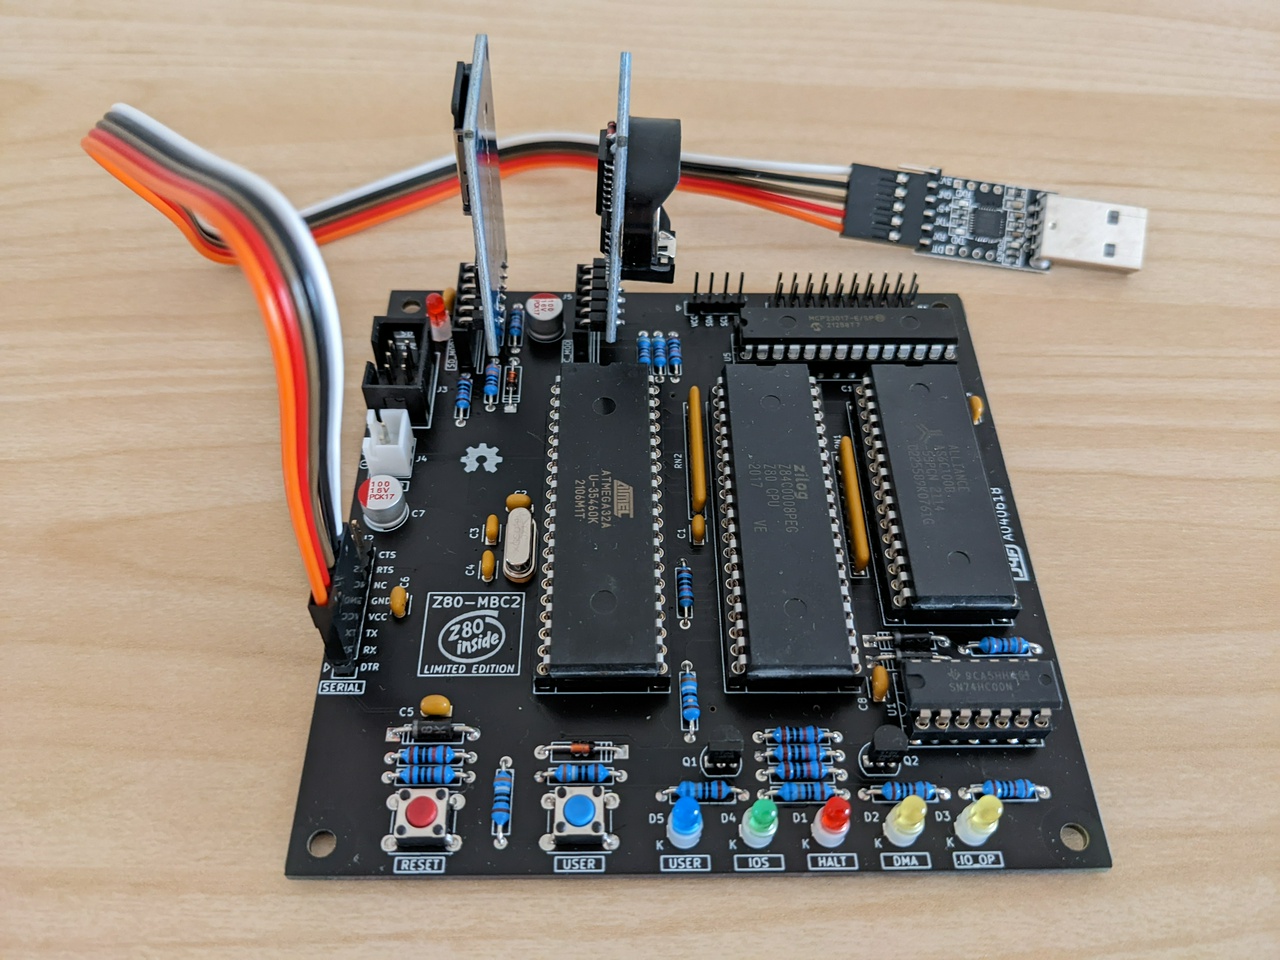
The Z80-MBC2 comes with two additional small cards (a microSD reader and a real-time clock unit) and a USB serial adapter to plug into the main board. It was easy even for someone with no hardware skills like me, but I had to check some product photos and seek help to figure how to match the connectors.

Here is the board with all the parts plugged in.

Z80-MBC2 Z80 single-board computer.

What surpised me about the Z80-MBC2 is its heft compared with the small size. It weighs almost as much as a smartphone, as those old-fashioned chips pack a lot of stuff.

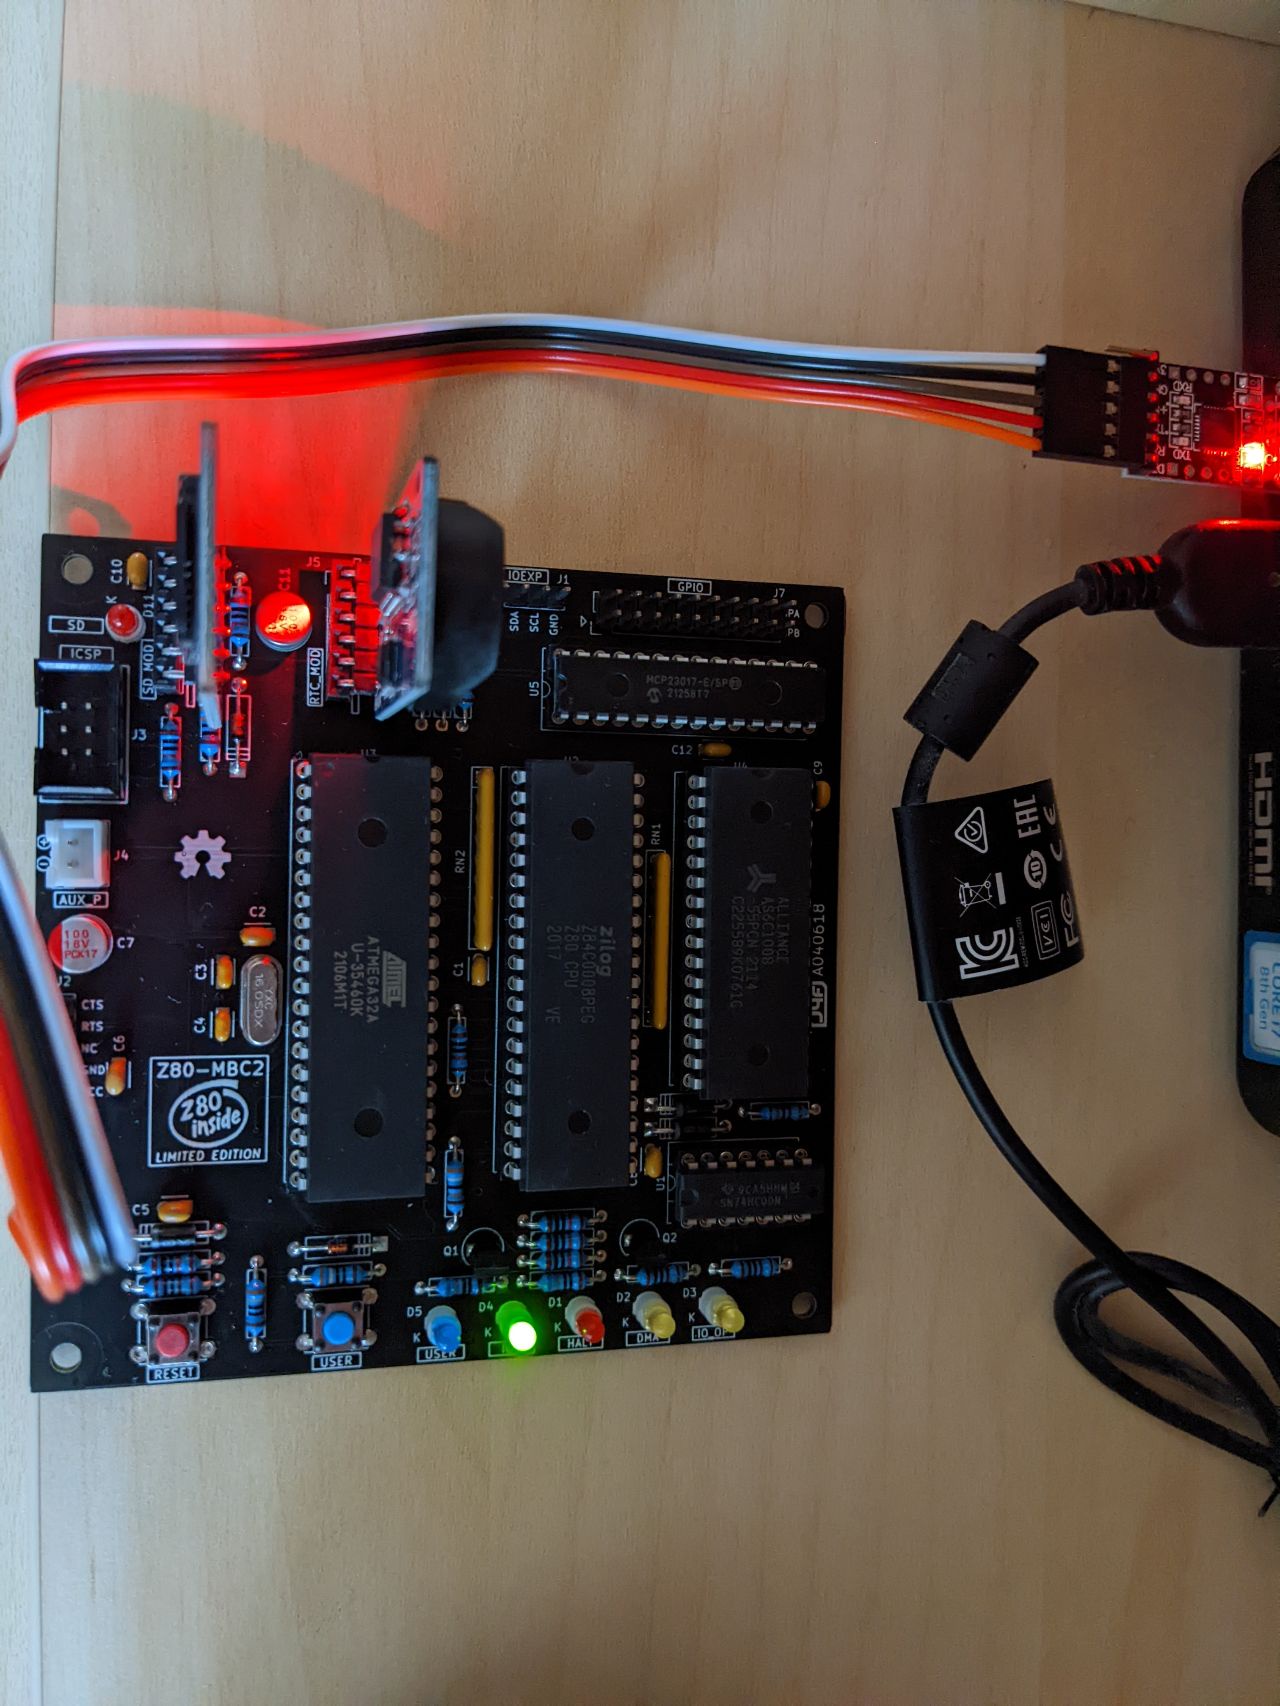
At 10x10 cm, the Z80-MBC2 is compact and fits well next to my Chromebox as this photo shows. Via the USB serial cable, long enough for my setup, I plug the unit into the Chromebox and access it via the Minicom terminal emulator.

Z80-MBC2 Z80 computer board connected to an ASUS Chromebox 3.

I haven't perceived any significant warming of the board after prolonged use. The readings of the built-in temperature sensor usually stick around 32-33° C.

Software

The Z80-MBC2 is a great kit aimed at hobbysts and electronic enthusiasts, but no mnual is available. There's little documentation on how to operate the product and what it can do.

However, some background on computer technology, programming languages, and 1980s 8-bit systems make it easy to learn by experimenting and interacting with the board. The Z80-MBC2 project site, as well as the site of the predecessor Z80-MBC, are useful sources on the features and capabilities of the product.

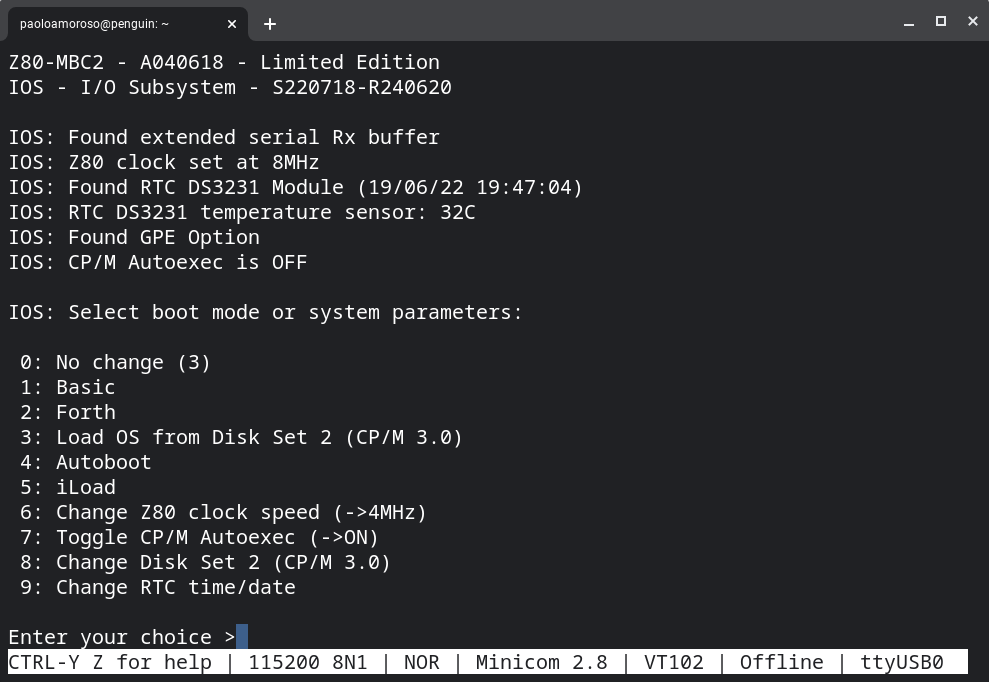
The firmware comes with lots of software and tools, see this screenshot of the boot menu. There are programming language interpreters like on 1980s microcomputers, such as BASIC and Forth, and a number of operating systems like CP/M 2.2 and 3.0.

Boot menu of the Z80M-MBC2 single-board computer in a Minicom Linux session over a serial USB connection.

The firmware provides an option for uploading an executable file in Intel HEX format. For example, this allows experimenting with software designed to run on the bare metal such as resident monitors or other low-level code.

Value and potential

I bought a professionally assembled and tested Z80-MBC2 unit. The main value of this solution is the product is pretty much plug and play.

It comes with everything needed to start using the board. In particular, the latest version of the firmware, which fixes some I/O issues, and the USB serial adapter. All I have to do is plug the board's USB connector into a port of my Chromebox.

The board is perfect for running my Assembly code on actual hardware.

The Z80-MBC2 is also an interactive history of computing lab, a way of feeling first-hand the performance and latency of early 8-bit microcomputers and I/O. I actually experienced that kind of performance back in the day but lost touch with it long ago.

Issues

I love the Z80-MBC2 but an issue is limiting what I can do with it: XMODEM file transfers from Crostini Linux to the board time out. Given XMODEM is the most effective way of sending code and programs to the board, this is a major inconvenience.

I'm troubleshooting the issue with the help of comp.os.cpm. The Z80-MBC2 developer reassured me it's likely not a firmware problem, as versions earlier than the one I have didn't fully support XMODEM.

Meanwhile, I'm looking for workarounds shouldn't I be able to devise a fix.

For example, I could paste a file from the terminal emulator to a text editor running on the board. Another less practical option would be to copy the files on the microSD card, the mass storage device of the Z80 system.

#z80mbc2 #sbc #CPM

Discuss... Email | Reply @amoroso@fosstodon.org

In the Crostini Linux Minicom terminal emulation session of this screenshot, a hello world Intel 8080 Assembly program run under CP/M on the Z80-MBC2 Z80 homebrew computer, printing the string Greetings from Suite8080 to the console.

Screenshot of a Crostini Linux Minicom session showing a hello world Assembly demo running under CP/M on a Z80-MBC2 Z80 computer.

It may not seem like much, but it's a personal achievement I'm proud of.

The demo program comes with Suite8080, a suite of Intel 8080 Assembly cross-development tools I'm writing in Python. I created the demo, assembled it with my own assembler, and run it on actual hardware. Just a few months ago I didn't think I could do this.

Running the demo also helped me put together and test a cross-development toolchain based on Suite8080. For example, I learnt how to transfer files via XMODEM from Crostini to the Z80 board.

I can't wait to use the toolchain to develop more code for the Z80-MBC2.

#Suite8080 #z80mbc2 #sbc #CPM

Discuss... Email | Reply @amoroso@fosstodon.org

It turns out the Z80-MBC2 Z80 homebrew computer does work with chromeOS. This screenshot of a Minicom session under Crostini Linux shows CP/M 3.0 booting up on the Z80 board.

The Z80-MBC2 Z80 computer booting up CP/M 3.0 in a Minicom session under Crostini Linux on an ASUS Chromebox 3.

It took some troubleshooting of the connection between the Z80-MBC2 and my Chromebox to make chromeOS detect the board. How?

I just re-plugged the board's USB cable into the Chromebox.

The idea came as a result of asking for help on r/chromeos. A redditor noted connecting a USB serial device to a chromeOS machine is a bit hit and miss, i.e. some attempts to connect may not be successful.

This prompted me to re-plug the Z80-MBC2, and chromeOS popped up a notification to let me share the detected USB device with Crostini. It's been working consistently since then.

Interestingly, the board is supported only under Crostini but not in the Android container or the web subsystem of chromeOS, as the Serial USB Terminal Android app and the web apps based on the USB Web Serial API still don't detect the Z80-MBC2.

I can finally dive into and play with this awesome gadget. Fun ahead!

#z80mbc2 #sbc

Discuss... Email | Reply @amoroso@fosstodon.org

The Z80-MBC2 board, a Z80 homebrew computer I ordered, finally arrived and I connected it via serial USB to my i7 ASUS Chromebox 3, hoping to control the board from a terminal emulator.

I got a professionally assembled and tested Z80-MBC2 unit and the developer confirmed I hooked it up correctly, so I'm confident the hardware is working. All the right leds are on, as shows this photo of the board connected to the Chromebox at right (the “Z80 inside” logo alone is worth the board).

Z80-MBC2 Z80 computer board connected to an ASUS Chromebox 3.

However, the Chromebox doesn't recognize the board neither under Crostini, nor Android, nor chromeOS.

In Crostini, the output of lsusb doesn't list the board:

Bus 002 Device 001: ID 1d6b:0003 Linux Foundation 3.0 root hub
Bus 001 Device 001: ID 1d6b:0002 Linux Foundation 2.0 root hub

The output of usb-devices doesn't list it either:

T:  Bus=01 Lev=00 Prnt=00 Port=00 Cnt=00 Dev#=  1 Spd=480 MxCh= 8
D:  Ver= 2.00 Cls=09(hub  ) Sub=00 Prot=01 MxPS=64 #Cfgs=  1
P:  Vendor=1d6b ProdID=0002 Rev=05.10
S:  Manufacturer=Linux 5.10.110-15808-ge5740beba59b xhci-hcd
S:  Product=xHCI Host Controller
S:  SerialNumber=0000:00:0c.0
C:  #Ifs= 1 Cfg#= 1 Atr=e0 MxPwr=0mA
I:  If#=0x0 Alt= 0 #EPs= 1 Cls=09(hub  ) Sub=00 Prot=00 Driver=hub

T:  Bus=02 Lev=00 Prnt=00 Port=00 Cnt=00 Dev#=  1 Spd=5000 MxCh= 8
D:  Ver= 3.00 Cls=09(hub  ) Sub=00 Prot=03 MxPS= 9 #Cfgs=  1
P:  Vendor=1d6b ProdID=0003 Rev=05.10
S:  Manufacturer=Linux 5.10.110-15808-ge5740beba59b xhci-hcd
S:  Product=xHCI Host Controller
S:  SerialNumber=0000:00:0c.0
C:  #Ifs= 1 Cfg#= 1 Atr=e0 MxPwr=0mA
I:  If#=0x0 Alt= 0 #EPs= 1 Cls=09(hub  ) Sub=00 Prot=00 Driver=hub

There's no entry related to the Z80-MBC2 in the output of ls -l /dev:

total 0
drwxr-xr-x 3 root   root          60 Jun 16 12:30 bus
crw--w---- 1 root   tty     136,   0 Jun 16 12:30 console
lrwxrwxrwx 1 root   root          11 Jun 16 12:30 core -> /proc/kcore
drwxr-xr-x 2 root   root          80 Jun 16 12:30 dri
lrwxrwxrwx 1 root   root          13 Jun 16 12:30 fd -> /proc/self/fd
crw-rw-rw- 1 nobody nogroup   1,   7 Jun 16 12:30 full
crw-rw-rw- 1 root   root     10, 229 Jun 16 12:30 fuse
lrwxrwxrwx 1 root   root          12 Jun 16 12:30 initctl -> /run/initctl
crw-rw---- 1 root   kvm      10, 232 Jun 16 12:30 kvm
lrwxrwxrwx 1 root   root          28 Jun 16 12:30 log -> /run/systemd/journal/dev-log
drwxr-xr-x 2 nobody nogroup       60 Jun 16 12:30 lxd
drwxrwxrwt 2 nobody nogroup       40 Jun 16 12:30 mqueue
drwxr-xr-x 2 root   root          60 Jun 16 12:30 net
crw-rw-rw- 1 nobody nogroup   1,   3 Jun 16 12:30 null
crw-rw-rw- 1 root   root      5,   2 Jun 16 12:43 ptmx
drwxr-xr-x 2 root   root           0 Jun 16 12:30 pts
crw-rw-rw- 1 nobody nogroup   1,   8 Jun 16 12:30 random
drwxrwxrwt 2 root   root          40 Jun 16 12:30 shm
drwxr-xr-x 2 root   root         140 Jun 16 12:30 snd
lrwxrwxrwx 1 root   root          15 Jun 16 12:30 stderr -> /proc/self/fd/2
lrwxrwxrwx 1 root   root          15 Jun 16 12:30 stdin -> /proc/self/fd/0
lrwxrwxrwx 1 root   root          15 Jun 16 12:30 stdout -> /proc/self/fd/1
crw-rw-rw- 1 nobody nogroup   5,   0 Jun 16 12:30 tty
crw-rw-rw- 1 nobody nogroup   1,   9 Jun 16 12:30 urandom
crw-rw-rw- 1 root   root    245,   0 Jun 16 12:30 wl0
crw-rw-rw- 1 nobody nogroup   1,   5 Jun 16 12:30 zero

In the Android contanier I use the Serial USB Terminal terminal emulator app, but the Z80-MBC2 doesn't show up in its list of USB devices.

Finally, on chromeOS I use a few terminal emulator web apps based on the USB Web Serial API, such as this one. Again, there's no Z80-MBC2 entry in the app's list of USB devices.

I connected the Z80 board also to my Lenovo Yoga N26 Chromebook. Same result under chromeOS and Android, i.e. the device isn't detected. I don't use Crostini on the Chromebook.

I have a couple more things to try, but I suspect chromeOS doesn't support the board's serial adapter.

I knew USB is chromeOS' Achille's heel. But, although I expected USB issues with Crostini because of its heavily sandboxed environment, what suprised me is the Z80-MBC2 is not detected by chromeOS or the Android container, which may have fewer USB restrictions and wider support.

#z80mbc2 #sbc #CPM

Discuss... Email | Reply @amoroso@fosstodon.org

I ordered a Z80-MBC2 Limited Edition Tin, an awesome homebrew Z80 single-board computer. It's available as a kit but I picked an assembled unit as I'm not familiar with hardware and soldering.

It was part planned and part impulse buy.

My Suite8080 project, a suite of Intel 8080 Aseembly cross-development tools I'm writing in Python, is making me rediscover the 8080 and Z80 CPUs, CP/M, and retrocomputing.

I'm having a lot of fun writing 8080 Assembly programs and running them under CP/M emulators, but I'd like to test my code also on actual hardware. So a few months ago I ordered a Z80 Membership Card, a homebrew 4 MHz Z80 single-board computer that runs CP/M 2.2. It comes only as a kit, so I'm having a hardware-savvy friend assemble it.

Yesterday I was googling for more Z80 homebrew computers and run across the Z80-MBC2. I noticed its impressive features such as an 8 MHz Z80, support for running different operating systems, including CP/M 2.2 and 3, and more. The product soon ended up in my shopping cart.

There's another reason why I want a second Z80 computer: redundancy.

I'll access these computers by connecting them to my Chrome OS devices via serial USB and running a terminal emulator. However, Chrome OS may or may not support the serial USB adapters of those computers and the only way to know is to try them. A second unit improves the odds at least one of them works.

For maximum flexibility I'd like to access the computers from Crostini Linux, but its sandbox may limit USB access. There are other options, such as running a Web Serial terminal emulator app under Chrome OS, or a similar app in the Android container. As a last resort, it should be possible to hook up the computers to my Android devices via an OTG USB adapter.

The Z80-MBC2 is about to be shipped and I look forward to receiving it.

#z80mbc2 #sbc #retrocomputing #CPM

Discuss... Email | Reply @amoroso@fosstodon.org